An Internationalized Software Project With Auto Tools
Prev Compiling under windows Next

Compiling under windows

Compiling under windows requires at least a compiler. There are some free compiler available but also the commercial visual studio (version 6 or above) can be used. There are several problems to solve: The first question depends on how the software should be built: by a command line tool (as in linux/unix) or with the ide. If the windows platform should be used to develop parts of the program, the ide is the best choice. Here a new project has to be created and all source code files have to be added manually. Each change in the source file structure have to be adjusted to this project file. The source code exchange with linux/unix can be done via a revision control system. The windows project can be checked in here as well.

The .mo file generation can be done under windows, as there exists a windows version of gettext. It is recommended to use this, otherwise the .gmo files have to be built under linux/unix and copied to windows.

The next two steps require xsltproc and po4a, which are not available under windows. Here a unix environment under windows might help. Or these steps (make update-docs) are done under unix/linux and the result files (.hhc, .hhp, .hhk, .html) are transferred to windows.

The next step, the .chm generation must be performed under windows. To do so, the help compiler hcc, which is freely available from microsoft, has to be used. It takes the .hhp file, which refers to the other, and creates the .chm file.

Buidling testproj

Following the path described above, teh first step to build testproj is to install visual studio (version 6 or above) and to build and install wxWidgets. After synchronizing or just copying the sources into a project folder, a visual studio project has to be created. All sources have to be added. The project settings for the debug target are: For the release target: For outomated builds, a makefile should be exported. This has to be repeated, whenever a file is added or removed or a project setting is changed. With such an exported makefile, the following batch file builds the project:

buildAll.bat

del /q /s Release
nmake /f testproj.mak CFG="testproj - Win32 Release"
del /q /s Installer
mkdir Installer
copy Release\testproj.exe Installer
call buildDoc.bat
All files to release are copied into the "Installer" directory. The called buildDoc.bat batch files builds the documentation. It requires a windows version of gettext to be installed. Furthermore the help compiler has to be in the search path (has must be added to it in the batch file).

buildDoc.bat

@set oldpath=%PATH%
@set PATH=%PATH%;"C:\Program Files\GnuWin32\bin"

mkdir Installer
mkdir Installer\doc
mkdir Installer\doc\de
mkdir Installer\po
mkdir Installer\po\de

hhc doc\testproj.hhp
copy doc\testproj.chm Installer\doc\testproj.chm
hhc doc\de\testproj.hhp
copy doc\de\testproj.chm Installer\doc\de\testproj.chm

msgfmt -c --statistics -o Installer\po/de/testproj.mo po/de.po

@set PATH=%oldpath%
Whenever a new language is added, this file has to be modified as well. If buildAll.bat runs without error, all files to be installed are in the "Installer" directory, already in the correct directory structure. It can be just compressed and shipped, or an installer can be built around it.

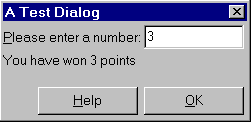
If started, the main window looks simmilar to that in the x-windows case. The dialog e.g. look like:

If the program is started, a log window opens, showing some trace messages. This might be okay for the testing phase, but will anoy the end user. Unfortunately there is no way to trace to the console, as there is no text console for windows applications. There are several workarounds.

One is, to run the program as a console application. To do so just a few line has to added into main.cpp:

src/main.cpp

...

int wmain(int argc, char* argv[])
{
	return WinMain(::GetModuleHandle(NULL), NULL, ::GetCommandLineA(), SW_SHOWNORMAL);
}
Furthermore, /subsystem:console has to be added to the compiler switches. The disadvantage is, that now always a console opens, if the program is started, even ist just an icon is double clicked.

Another workaround is to trace into a file. To do so, a FILE variable is required:

src/gui/testproj_app.h

...

	wxLog * m_oldLogger;
	FILE * m_traceFile;

...
This has to be initialized and release properly:

src/gui/testproj_app.cpp

...

CTestProjApp::CTestProjApp() : m_helpController(NULL), m_localeSwitchFound(false)
	, m_deleteLogger(false), m_oldLogger(NULL), m_traceFile(NULL)
{
}

CTestProjApp::~CTestProjApp()
{
	delete m_helpController;
	if (m_deleteLogger)
	{
		delete wxLog::SetActiveTarget(m_oldLogger);
	}
	if (m_traceFile)
	{
		fclose(m_traceFile);
	}
}

bool CTestProjApp::OnInit()
{
	wxLog::SetVerbose(true);
#ifndef __WXMSW__ 
	m_oldLogger = wxLog::SetActiveTarget( new wxLogStderr );
	m_deleteLogger = true;
#else
	m_traceFile = fopen("C:\\trace.txt", "wt");
	m_oldLogger = wxLog::SetActiveTarget( new wxLogStderr(m_traceFile) );
	m_deleteLogger = true;
#endif

...
The added line in OnInit, create a trace file (here in the root of drive c) and assign it to a logger. Now all trace messages go into that file.

A better solution might be verbose tracing into a file in the debug bulid and non verbose tracing (errors only) into the dialog on realease builds.

This small course ends now in a conclusion.
Prev Home Next
Using wxWidgets Conclusion